プロビジョニングツールによる環境構築をやってみたかったのですが、さまざまなプロビジョニングツールがあるなか、どれを学べばいいのかなんて正直わかリません。
シンプルで覚えやすいものが残るという直感に従って Ansible にチャレンジしてみました (^^)

Ansible 入門:準備編
Ansibleは、管理対象のサーバーに対して、sshを使ったアクセスでタスクを実行することで環境を構築するためのツールです
ググってみたらとても参考になる記事が見つかりました
Ansible チュートリアル | Ansible Tutorial in Japanese
ちょっと前の記事ですが、定番的なチュートリアルのようです
チュートリアルをやってみたところ、普段は Windowsを使っていて Linux が苦手という方だとなかなかうまくいかないよーという所があるかも知れません
そんな自分と同じような Windowsユーザー向けに元記事のチュートリアルを補足しながら Ansible を体験した様子を紹介します (^^)
Vagrant 環境作成
その前に、Vagrant を使用しますので、まだインストールされていない方は、その環境を作成して下さい
Vagrant の基本的な操作がわからない方は、インストール後下記記事の Getting Started を行って基本的な操作の習得もして下さい
Vagrant 仮想マシン入門 Getting Started をやってみる

チュートリアル用プロジェクト作成
- 適当なディレクトリにプロジェクト用の ansible-tutorial フォルダーを作ります
- そのフォルダーで右クリックメニューから Git Bash here でターミナルを起動します
- ターミナルから vagrant init を実行して Vagrantfile を作成します
vagrant init centos6 http://opscode-vm-bento.s3.amazonaws.com/vagrant/virtualbox/opscode_centos-6.5_chef-provisionerless.box
※ここで指定しているBOXは、Chef社が公開している Cent-os 6.5 のイメージを使用していますが、Cent-os 6.x なら別のBoxイメージでもチュートリアルは出来ると思います
Vagrantfile 修正
参考記事の Vagrantfile の修正に加えて node1 用の同期フォルダーの設定を追加しています。これによって Linux に不慣れな Windows ユーザーでも少し作業しやすくなります (^^)
15行目の config.vm.box = “centos6” をコメントアウトして、そこに下記コードを挿入して保存して下さい
#  config.vm.box = "centos6"
  config.vm.define :node1 do |node|
    node.vm.box = "centos6"
    node.vm.network :forwarded_port, guest: 22, host: 2001, id: "ssh"
    node.vm.network :private_network, ip: "192.168.33.11"

    node.vm.synced_folder 'tutorial/', '/home/vagrant/tutorial', :create => 'true', :mount_options => ["dmode=777","fmode=666"]
  end

  config.vm.define :node2 do |node|
    node.vm.box = "centos6"
    node.vm.network :forwarded_port, guest: 22, host: 2002, id: "ssh"
    node.vm.network :forwarded_port, guest: 80, host: 8000, id: "http"
    node.vm.network :private_network, ip: "192.168.33.12"
  end
仮想マシン起動
それでは、vagrant up を行います
最初は、BOXイメージのダウンロードも行われるので少し時間がかかります。
こんな表示がされるはずです
$ vagrant up
Bringing machine 'node1' up with 'virtualbox' provider...
Bringing machine 'node2' up with 'virtualbox' provider...
==> node1: Box 'centos6' could not be found. Attempting to find and install...
    node1: Box Provider: virtualbox
    node1: Box Version: >= 0
==> node1: Box file was not detected as metadata. Adding it directly...
==> node1: Adding box 'centos6' (v0) for provider: virtualbox
    node1: Downloading: http://opscode-vm-bento.s3.amazonaws.com/vagrant/virtualbox/opscode_centos-6.5_chef-provisionerless.box
    node1:
==> node1: Successfully added box 'centos6' (v0) for 'virtualbox'!
==> node1: Importing base box 'centos6'...
==> node1: Matching MAC address for NAT networking...
==> node1: Setting the name of the VM: ansible-tutorial_node1_1452220962415_71283
==> node1: Clearing any previously set network interfaces...
==> node1: Preparing network interfaces based on configuration...
    node1: Adapter 1: nat
    node1: Adapter 2: hostonly
==> node1: Forwarding ports...
    node1: 22 => 2001 (adapter 1)
==> node1: Booting VM...
==> node1: Waiting for machine to boot. This may take a few minutes...
    node1: SSH address: 127.0.0.1:2001
    node1: SSH username: vagrant
    node1: SSH auth method: private key
    node1: Warning: Connection timeout. Retrying...
    node1:
    node1: Vagrant insecure key detected. Vagrant will automatically replace
    node1: this with a newly generated keypair for better security.
    node1:
    node1: Inserting generated public key within guest...
    node1: Removing insecure key from the guest if it's present...
    node1: Key inserted! Disconnecting and reconnecting using new SSH key...
==> node1: Machine booted and ready!
==> node1: Checking for guest additions in VM...
    node1: The guest additions on this VM do not match the installed version of
    node1: VirtualBox! In most cases this is fine, but in rare cases it can
    node1: prevent things such as shared folders from working properly. If you see
    node1: shared folder errors, please make sure the guest additions within the
    node1: virtual machine match the version of VirtualBox you have installed on
    node1: your host and reload your VM.
    node1:
    node1: Guest Additions Version: 4.3.8
    node1: VirtualBox Version: 5.0
==> node1: Configuring and enabling network interfaces...
==> node1: Mounting shared folders...
    node1: /vagrant => C:/HashiCorp/Project/ansible-tutorial
==> node2: Box 'centos6' could not be found. Attempting to find and install...
    node2: Box Provider: virtualbox
    node2: Box Version: >= 0
==> node2: Box file was not detected as metadata. Adding it directly...
==> node2: Adding box 'centos6' (v0) for provider: virtualbox
==> node2: Importing base box 'centos6'...
==> node2: Matching MAC address for NAT networking...
==> node2: Setting the name of the VM: ansible-tutorial_node2_1452221057435_34743
==> node2: Clearing any previously set network interfaces...
==> node2: Preparing network interfaces based on configuration...
    node2: Adapter 1: nat
    node2: Adapter 2: hostonly
==> node2: Forwarding ports...
    node2: 22 => 2002 (adapter 1)
    node2: 80 => 8000 (adapter 1)
==> node2: Booting VM...
==> node2: Waiting for machine to boot. This may take a few minutes...
    node2: SSH address: 127.0.0.1:2002
    node2: SSH username: vagrant
    node2: SSH auth method: private key
    node2: Warning: Connection timeout. Retrying...
    node2:
    node2: Vagrant insecure key detected. Vagrant will automatically replace
    node2: this with a newly generated keypair for better security.
    node2:
    node2: Inserting generated public key within guest...
    node2: Removing insecure key from the guest if it's present...
    node2: Key inserted! Disconnecting and reconnecting using new SSH key...
==> node2: Machine booted and ready!
==> node2: Checking for guest additions in VM...
    node2: The guest additions on this VM do not match the installed version of
    node2: VirtualBox! In most cases this is fine, but in rare cases it can
    node2: prevent things such as shared folders from working properly. If you see
    node2: shared folder errors, please make sure the guest additions within the
    node2: virtual machine match the version of VirtualBox you have installed on
    node2: your host and reload your VM.
    node2:
    node2: Guest Additions Version: 4.3.8
    node2: VirtualBox Version: 5.0
==> node2: Configuring and enabling network interfaces...
==> node2: Mounting shared folders...
    node2: /vagrant => C:/HashiCorp/Project/ansible-tutorial
一気に2つの仮想マシンが作成されました
何故、仮想マシンが2つ必要かと言うと、Ansibleを 直接Windows から使えればターゲットの仮想マシンだけを用意すればいいはずですが、残念ながら現在は windows はホストコントローラにはなれないので node1 の Linux仮想マシンをホストコントローラにして、node2 の仮想マシンをターゲットにして環境を構築するためです
従って、これ以降は基本的には windows から離れ、仮想マシン node1 から操作を行う形となります
※Linuxに慣れている方は、全て node1 から作業すれば良いのですが、慣れていない方向けに node1 マシンの /home/vagrant 下にチュートリアル作業用の tutorial フォルダーを作成して同期フォルダーとすることで、一部の作業を windows 側からでも出来るようにしてあります (^^)
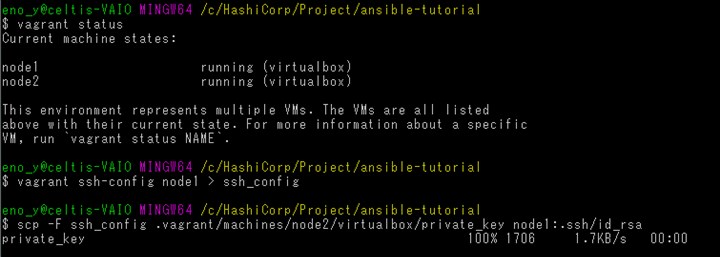
SSHアクセス許可
vagrant status で仮想マシンが起動しているか確認して、node1 から node2 へアクセスできるように Vagrant 用の SSH秘密鍵をコピーします
$ vagrant ssh-config node1 > ssh_config
$ scp -F ssh_config .vagrant/machines/node2/virtualbox/private_key node1:.ssh/id_rsa
Ansibleインストール
node1マシンに ansible をインストールします
元記事のチュートリアルでは pip を使って ansible をインストールしていますが、ここでは yum パッケージマネージャを使ってインストールしてみます
vagrant ssh node1 で仮想マシンへログインして、以下ターミナル内からコマンドラインで入力です
- インストールは管理者権限が必要なので su (パスワード vagrant) で権限取得
- Ansibleは Cent-os の標準リポジトリに含まれていないので、yum install epel-release で EPELリポジトリを追加
- Ansible を yum install ansible でインストール
参考までに実行ログを貼り付けておきます
[vagrant@localhost ~]$ su
Password:

[root@localhost vagrant]# yum install epel-release
Loaded plugins: fastestmirror
Determining fastest mirrors
 * base: ftp.iij.ad.jp
 * extras: ftp.iij.ad.jp
 * updates: ftp.iij.ad.jp
base                                                                      | 3.7 kB     00:00
base/primary_db                                                           | 4.6 MB     00:00
extras                                                                    | 3.4 kB     00:00
extras/primary_db                                                         |  34 kB     00:00
updates                                                                   | 3.4 kB     00:00
updates/primary_db                                                        | 3.3 MB     00:00
Setting up Install Process
Resolving Dependencies
--> Running transaction check
---> Package epel-release.noarch 0:6-8 will be installed
--> Finished Dependency Resolution

Dependencies Resolved

=================================================================================================
 Package                    Arch                 Version              Repository            Size
=================================================================================================
Installing:
 epel-release               noarch               6-8                  extras                14 k

Transaction Summary
=================================================================================================
Install       1 Package(s)

Total download size: 14 k
Installed size: 22 k
Is this ok [y/N]: y
Downloading Packages:
epel-release-6-8.noarch.rpm                                               |  14 kB     00:00
warning: rpmts_HdrFromFdno: Header V3 RSA/SHA1 Signature, key ID c105b9de: NOKEY
Retrieving key from file:///etc/pki/rpm-gpg/RPM-GPG-KEY-CentOS-6
Importing GPG key 0xC105B9DE:
 Userid : CentOS-6 Key (CentOS 6 Official Signing Key) <centos-6-key@centos.org>
 Package: centos-release-6-5.el6.centos.11.1.x86_64 (@anaconda-CentOS-201311272149.x86_64/6.5)
 From   : /etc/pki/rpm-gpg/RPM-GPG-KEY-CentOS-6
Is this ok [y/N]: y
Running rpm_check_debug
Running Transaction Test
Transaction Test Succeeded
Running Transaction
  Installing : epel-release-6-8.noarch                                                       1/1
  Verifying  : epel-release-6-8.noarch                                                       1/1

Installed:
  epel-release.noarch 0:6-8

Complete!


[root@localhost vagrant]# yum install ansible
Loaded plugins: fastestmirror
Loading mirror speeds from cached hostfile
epel/metalink                                                             | 7.1 kB     00:00
 * base: ftp.iij.ad.jp
 * epel: ftp.kddilabs.jp
 * extras: ftp.iij.ad.jp
 * updates: ftp.iij.ad.jp
epel                                                                      | 4.3 kB     00:00
epel/primary_db                                                           | 5.7 MB     00:01
Setting up Install Process
Resolving Dependencies
--> Running transaction check
---> Package ansible.noarch 0:1.9.4-1.el6 will be installed
--> Processing Dependency: sshpass for package: ansible-1.9.4-1.el6.noarch
--> Processing Dependency: python-simplejson for package: ansible-1.9.4-1.el6.noarch
--> Processing Dependency: python-setuptools for package: ansible-1.9.4-1.el6.noarch
--> Processing Dependency: python-paramiko for package: ansible-1.9.4-1.el6.noarch
--> Processing Dependency: python-keyczar for package: ansible-1.9.4-1.el6.noarch
--> Processing Dependency: python-jinja2 for package: ansible-1.9.4-1.el6.noarch
--> Processing Dependency: python-httplib2 for package: ansible-1.9.4-1.el6.noarch
--> Processing Dependency: python-crypto2.6 for package: ansible-1.9.4-1.el6.noarch
--> Processing Dependency: PyYAML for package: ansible-1.9.4-1.el6.noarch
--> Running transaction check
---> Package PyYAML.x86_64 0:3.10-3.1.el6 will be installed
--> Processing Dependency: libyaml-0.so.2()(64bit) for package: PyYAML-3.10-3.1.el6.x86_64
---> Package python-crypto2.6.x86_64 0:2.6.1-2.el6 will be installed
---> Package python-httplib2.noarch 0:0.7.7-1.el6 will be installed
---> Package python-jinja2.x86_64 0:2.2.1-2.el6_5 will be installed
--> Processing Dependency: python-babel >= 0.8 for package: python-jinja2-2.2.1-2.el6_5.x86_64
---> Package python-keyczar.noarch 0:0.71c-1.el6 will be installed
--> Processing Dependency: python-pyasn1 for package: python-keyczar-0.71c-1.el6.noarch
--> Processing Dependency: python-crypto for package: python-keyczar-0.71c-1.el6.noarch
---> Package python-paramiko.noarch 0:1.7.5-2.1.el6 will be installed
---> Package python-setuptools.noarch 0:0.6.10-3.el6 will be installed
---> Package python-simplejson.x86_64 0:2.0.9-3.1.el6 will be installed
---> Package sshpass.x86_64 0:1.05-1.el6 will be installed
--> Running transaction check
---> Package libyaml.x86_64 0:0.1.3-4.el6_6 will be installed
---> Package python-babel.noarch 0:0.9.4-5.1.el6 will be installed
---> Package python-crypto.x86_64 0:2.0.1-22.el6 will be installed
---> Package python-pyasn1.noarch 0:0.0.12a-1.el6 will be installed
--> Finished Dependency Resolution

Dependencies Resolved

=================================================================================================
 Package                      Arch              Version                    Repository       Size
=================================================================================================
Installing:
 ansible                      noarch            1.9.4-1.el6                epel            1.7 M
Installing for dependencies:
 PyYAML                       x86_64            3.10-3.1.el6               base            157 k
 libyaml                      x86_64            0.1.3-4.el6_6              base             52 k
 python-babel                 noarch            0.9.4-5.1.el6              base            1.4 M
 python-crypto                x86_64            2.0.1-22.el6               base            159 k
 python-crypto2.6             x86_64            2.6.1-2.el6                epel            513 k
 python-httplib2              noarch            0.7.7-1.el6                epel             70 k
 python-jinja2                x86_64            2.2.1-2.el6_5              base            466 k
 python-keyczar               noarch            0.71c-1.el6                epel            219 k
 python-paramiko              noarch            1.7.5-2.1.el6              base            728 k
 python-pyasn1                noarch            0.0.12a-1.el6              base             70 k
 python-setuptools            noarch            0.6.10-3.el6               base            336 k
 python-simplejson            x86_64            2.0.9-3.1.el6              base            126 k
 sshpass                      x86_64            1.05-1.el6                 epel             19 k

Transaction Summary
=================================================================================================
Install      14 Package(s)

Total download size: 6.0 M
Installed size: 29 M
Is this ok [y/N]: y
Downloading Packages:
(1/14): PyYAML-3.10-3.1.el6.x86_64.rpm                                    | 157 kB     00:00
(2/14): ansible-1.9.4-1.el6.noarch.rpm                                    | 1.7 MB     00:00
(3/14): libyaml-0.1.3-4.el6_6.x86_64.rpm                                  |  52 kB     00:00
(4/14): python-babel-0.9.4-5.1.el6.noarch.rpm                             | 1.4 MB     00:00
(5/14): python-crypto-2.0.1-22.el6.x86_64.rpm                             | 159 kB     00:00
(6/14): python-crypto2.6-2.6.1-2.el6.x86_64.rpm                           | 513 kB     00:00
(7/14): python-httplib2-0.7.7-1.el6.noarch.rpm                            |  70 kB     00:00
(8/14): python-jinja2-2.2.1-2.el6_5.x86_64.rpm                            | 466 kB     00:00
(9/14): python-keyczar-0.71c-1.el6.noarch.rpm                             | 219 kB     00:00
(10/14): python-paramiko-1.7.5-2.1.el6.noarch.rpm                         | 728 kB     00:00
(11/14): python-pyasn1-0.0.12a-1.el6.noarch.rpm                           |  70 kB     00:00
(12/14): python-setuptools-0.6.10-3.el6.noarch.rpm                        | 336 kB     00:00
(13/14): python-simplejson-2.0.9-3.1.el6.x86_64.rpm                       | 126 kB     00:00
(14/14): sshpass-1.05-1.el6.x86_64.rpm                                    |  19 kB     00:00
-------------------------------------------------------------------------------------------------
Total                                                            2.5 MB/s | 6.0 MB     00:02
warning: rpmts_HdrFromFdno: Header V3 RSA/SHA256 Signature, key ID 0608b895: NOKEY
Retrieving key from file:///etc/pki/rpm-gpg/RPM-GPG-KEY-EPEL-6
Importing GPG key 0x0608B895:
 Userid : EPEL (6) <epel@fedoraproject.org>
 Package: epel-release-6-8.noarch (@extras)
 From   : /etc/pki/rpm-gpg/RPM-GPG-KEY-EPEL-6
Is this ok [y/N]: y
Running rpm_check_debug
Running Transaction Test
Transaction Test Succeeded
Running Transaction
  Installing : python-crypto-2.0.1-22.el6.x86_64                                            1/14
  Installing : python-paramiko-1.7.5-2.1.el6.noarch                                         2/14
  Installing : sshpass-1.05-1.el6.x86_64                                                    3/14
  Installing : python-setuptools-0.6.10-3.el6.noarch                                        4/14
  Installing : python-crypto2.6-2.6.1-2.el6.x86_64                                          5/14
  Installing : python-simplejson-2.0.9-3.1.el6.x86_64                                       6/14
  Installing : python-httplib2-0.7.7-1.el6.noarch                                           7/14
  Installing : python-pyasn1-0.0.12a-1.el6.noarch                                           8/14
  Installing : python-keyczar-0.71c-1.el6.noarch                                            9/14
  Installing : libyaml-0.1.3-4.el6_6.x86_64                                                10/14
  Installing : PyYAML-3.10-3.1.el6.x86_64                                                  11/14
  Installing : python-babel-0.9.4-5.1.el6.noarch                                           12/14
  Installing : python-jinja2-2.2.1-2.el6_5.x86_64                                          13/14
  Installing : ansible-1.9.4-1.el6.noarch                                                  14/14
  Verifying  : PyYAML-3.10-3.1.el6.x86_64                                                   1/14
  Verifying  : python-babel-0.9.4-5.1.el6.noarch                                            2/14
  Verifying  : python-keyczar-0.71c-1.el6.noarch                                            3/14
  Verifying  : libyaml-0.1.3-4.el6_6.x86_64                                                 4/14
  Verifying  : python-pyasn1-0.0.12a-1.el6.noarch                                           5/14
  Verifying  : python-httplib2-0.7.7-1.el6.noarch                                           6/14
  Verifying  : python-simplejson-2.0.9-3.1.el6.x86_64                                       7/14
  Verifying  : ansible-1.9.4-1.el6.noarch                                                   8/14
  Verifying  : python-jinja2-2.2.1-2.el6_5.x86_64                                           9/14
  Verifying  : python-crypto-2.0.1-22.el6.x86_64                                           10/14
  Verifying  : python-crypto2.6-2.6.1-2.el6.x86_64                                         11/14
  Verifying  : python-paramiko-1.7.5-2.1.el6.noarch                                        12/14
  Verifying  : python-setuptools-0.6.10-3.el6.noarch                                       13/14
  Verifying  : sshpass-1.05-1.el6.x86_64                                                   14/14

Installed:
  ansible.noarch 0:1.9.4-1.el6

Dependency Installed:
  PyYAML.x86_64 0:3.10-3.1.el6                   libyaml.x86_64 0:0.1.3-4.el6_6
  python-babel.noarch 0:0.9.4-5.1.el6            python-crypto.x86_64 0:2.0.1-22.el6
  python-crypto2.6.x86_64 0:2.6.1-2.el6          python-httplib2.noarch 0:0.7.7-1.el6
  python-jinja2.x86_64 0:2.2.1-2.el6_5           python-keyczar.noarch 0:0.71c-1.el6
  python-paramiko.noarch 0:1.7.5-2.1.el6         python-pyasn1.noarch 0:0.0.12a-1.el6
  python-setuptools.noarch 0:0.6.10-3.el6        python-simplejson.x86_64 0:2.0.9-3.1.el6
  sshpass.x86_64 0:1.05-1.el6

Complete!
インストール終了後は exit して標準ユーザーへ戻ります
以上で準備完了です (^^)
Ansible 入門:実践編
ansible コマンド
ansible コマンドを使って、コマンドラインから1つずつ実行させてみます
基本は以下の様な形式で、イベントリファイルに登録してある対象マシンを指定して、モジュールを使って行う処理を指定します
ansible <対象> [-i イベントリファイル] -m <モジュール名> [-a <モジュール引数>]
ansible 接続確認
それでは、実際に ansible を実行してみましょう
はじめに ansible が機能しているか ping モジュールで確認してみます
ansible 192.168.33.12 -m ping
うまく行きません
ansible は、イベントリファイルに書かれたターゲットマシンを対象にしますので、イベントリファイルにターゲットのアドレスやSSHの接続情報等を記述する必要があります
うまく行かなかったのは、デフォルトのイベントリファイル /etc/ansible/hosts に 192.168.33.12 が登録されていないので対象を確定できなかったためです
※イベントリファイルは、/etc/ansible/hosts を使わなくとも任意のディレクトリに作成したイベントリファイルを環境変数や -i オプションで指定することが出来ます
ここでは node1 のホームディレクトリにイベントリファイル hosts を作成して対象となる IPアドレスを登録してから実行してみます
コマンドラインから下記のように echo コマンドで hosts ファイルを作成します
echo 192.168.33.12 > hosts
作成した hosts ファイルをイベントリファイルとして指定してやってみます
ansible -i hosts 192.168.33.12 -m ping
これは、イベントリファイルに 192.168.33.12 が登録されているので実行されます

何やらエラーが発生しているようですが、Vagrant1.7以降の仕様変更によるもののようです
ちょっと古い Ansible チュートリアルを試してみたら Authentication failed でハマったメモ – 牌語備忘録 -pygo

下記を実行して known_hosts の空ファイルで対処出来るようです
touch ~/.ssh/known_hosts
ターゲットが1台しかない場合、何か無駄な書き方の様な感じもしますが、イベントリファイルにはグループ分けした複数台の対象を登録することが出来るようになっていて、様々な指定パターンで対象を柔軟に指定することが出来るようになっています
グループを登録して、対象にグループ名を指定すれば、グループに登録されている複数のマシンに対して実行することも可能です
イベントリファイルについての詳細は下記を参照して下さい
ここで確認したのは、ターゲット側の node2 マシンへは、特別に何もインストールしなくとも SSHで接続できれば、node1 から node2 へ対して Ansible を使って モジュールの実行が出来るということです (^^)
※Vagrant仮想マシンの構築を自動プロビジョニングを使って1台だけで行うような場合には、Vagrantのプロビジョニングで ansible を導入することで、ターゲットを自分自身(127.0.0.1) にして ansible の playbook を使い環境を構築することも出来ます
これでターゲットマシンへアクセスして実行するための環境が出来ましたが、ansible コマンドでは一つずつしか実行できませんので今ひとつメリットが感じられません
プロビジョニングツールの便利なところは、コマンド一発で同じ環境を構築出来るところなので、通常は複数のモジュールを使って構成手順をファイル化した playbook と言うのを使います
次は、複数のモジュールを使って簡単な playbook を作ってみます
ansible-playbook
それでは簡単な playbook を作成して、構成や使い方を覚えましょう
ここからは、Windows で使い慣れたUTF-8対応のエディターを使っていきます (^^)
同期フォルダー tutorial 内に下記内容の hosts ファイルを作成します
[test-servers]
192.168.33.12
次に simple-playbook.yml ファイルを下記内容で作成します
---
- hosts: test-servers
  become: yes
  tasks:
    - name: be sure httpd is installed
      yum: name=httpd state=installed
    - name: be sure httpd is running and enabled
      service: name=httpd state=started enabled=yes
作成したら vagrant ssh node1 にログインして ホームディレクトリ下の tutorial フォルダに hosts と simple-playbook.yml ファイルが作成されていることを確認して下さい
この playbook で httpd サーバーサービスのインストールと起動を行っています
playbookの構造
playbook の構造を簡単に紹介します
playbook は、複数のタスクを実行する手順を YAML というデータ構造を使い記述したファイルです
YAML
YAMLデータの主要な構成要素は、配列、マッピング、スカラー、コメントで、これらの組み合わせでインデント(通常は空白2文字)を付けてデータを構造的に記述していきます
| 配列 | – で値をセットします |
| マッピング | キーと値を : (コロンとスペース) で区切りセットします |
| スカラー | 数値、文字列、真偽値 |
| コメント | # 以下の行末迄の文字列をコメントとして扱います |
下記サイトが分かりやすく説明されているので参考になります
るびま
ansible使いのためのYAML入門 – @znz blog
このフォーマットを使うと、プログラムだけでなく人が見ても読める、書ける、理解りやすい記述が出来るので設定ファイルやデータ交換用ファイル等でもよく使われています
内容としては、ansible コマンドで1つずつ行っていた処理を YAML形式にして複数のタスクを連続で実行できるようにしたものです
先ほど記述した simple-playbook.yml ファイルをもう一度よく見て下さい
- 対象
- モジュール名
- 実行オプション/コマンド
これらが記述されているのがなんとなくわかると思います
対象は、- hosts で指定された test-servers です
become は、管理者権限での実行を指定しています
tasks は、モジュールと実行コマンドの指定です(ここでは2つのタスクがあります)
– name は、実行時に標準出力に表示される名前です。
1つ目のタスク
モジュール yum で cent-os のパッケージ管理を行います
name=httpd state=installed が実行オプションです
2つ目のタスク
モジュール service でサービスの起動や停止を行います
name=httpd state=started enabled=yes
また、playbook では、単にタスクを並べるだけでなく、変数定義や条件分岐、繰り返し等の処理を記述出来るようになっています
例えばパッケージのインストールを繰り返したい場合などは次の用に記述することも出来ます
- name: httpd installed
  yum: name={{ item }} state=latest
  with_items:
      - httpd
      - httpd-devel
あるいは Cent os のバージョン別に条件分岐させたい場合は、GATHERING FACTS(後で紹介) で取得した ansible_os_family、ansible_distribution_major_version 等を使って判断できます
- name: httpd config (CentOS/RHEL 6)
  include: conf-centos6.yml
  when: ansible_os_family == 'RedHat' and ansible_distribution_major_version|int == 6

- name: httpd config (CentOS/RHEL 7)
  include: conf-centos7.yml
  when: ansible_os_family == 'RedHat' and ansible_distribution_major_version|int == 7
基本的な形式はわかったと思いますが、実際にはモジュールを使いこなすにはそれなりの経験と知識が必要です
いずれにせよ ansible の肝はモジュールですので、沢山のモジュールが標準で用意されています
先ずは読めるように、次にカスタマイズを行えるように、最終的には1から作成できるようになりたいものです (^^)
playbookの実行
それでは、playbook を実行してみます
以下の様な指定で、 ansible-playbook コマンドでイベントリファイルと playbook ファイルを指定します
ansible-playbook [-i イベントリファイル] playbook名 [オプション引数]
元記事のチュートリアルに習い –syntax-check や –check オプションを付けて実行させる等いろいろ試してみてください
やってみると –check オプションを付け実行させた dry-run では、元記事のチュートリアルとはちょっと違った結果となりました
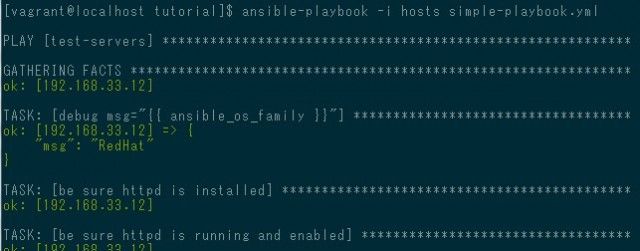
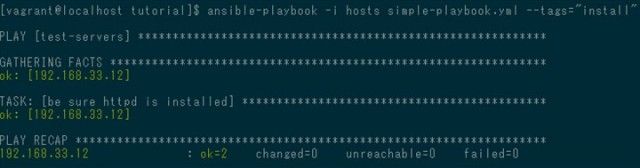
$ ansible-playbook -i hosts simple-playbook.yml --check

PLAY [test-servers] ***********************************************************

GATHERING FACTS ***************************************************************
ok: [192.168.33.12]

TASK: [be sure httpd is installed] ********************************************
changed: [192.168.33.12]

TASK: [be sure httpd is running and enabled] **********************************
failed: [192.168.33.12] => {"failed": true}
msg: no service or tool found for: httpd

FATAL: all hosts have already failed -- aborting

PLAY RECAP ********************************************************************
           to retry, use: --limit @/home/vagrant/simple-playbook.retry

192.168.33.12              : ok=2    changed=1    unreachable=0    failed=1
これは、実際は httpd がまだインストールされていないのに(–check オプションのため)その httpd サービスを起動させようとしたためエラーになったものと思われます
実際にインストール動作をさせるとエラーなく実行できました
$ ansible-playbook -i hosts simple-playbook.yml

PLAY [test-servers] ***********************************************************

GATHERING FACTS ***************************************************************
ok: [192.168.33.12]

TASK: [be sure httpd is installed] ********************************************
changed: [192.168.33.12]

TASK: [be sure httpd is running and enabled] **********************************
changed: [192.168.33.12]

PLAY RECAP ********************************************************************
192.168.33.12              : ok=3    changed=2    unreachable=0    failed=0
ここまでで、簡単な playbook を記述して実行させるところまでをやってみました
次に、上記の結果表示にある GATHERING FACTS とデバッグ用のオプションについて紹介します
GATHERING FACTS
Playbook を実行させると途中に GATHERING FACTS と表示されています
これは、playbookを実行させた時に対象サーバーから各種情報を収集する処理がデフォルトで実行されている為です
この、収集したデータは task のオプションやテンプレートの変数に使うことが出来ます
例えば、 Cent os のバージョン別に条件分岐させたい場合等で概に紹介済みですが、収集したデータは、様々な条件判定を組み合わせて playbook の記述で利用することが出来ます
手元の仮想マシンで取得したデータだとこんな感じです
$ ansible -m setup -i hosts 192.168.33.12
192.168.33.12 | success >> {
    "ansible_facts": {
        "ansible_all_ipv4_addresses": [
            "10.0.2.15",
            "192.168.33.12"
        ],
        "ansible_all_ipv6_addresses": [
            "fe80::a00:27ff:fece:83d",
            "fe80::a00:27ff:febd:216d"
        ],
        "ansible_architecture": "x86_64",
        "ansible_bios_date": "12/01/2006",
        "ansible_bios_version": "VirtualBox",
        "ansible_cmdline": {
            "KEYBOARDTYPE": "pc",
            "KEYTABLE": "us",
            "LANG": "en_US.UTF-8",
            "SYSFONT": "latarcyrheb-sun16",
            "quiet": true,
            "rd_LVM_LV": "VolGroup/lv_root",
            "rd_NO_DM": true,
            "rd_NO_LUKS": true,
            "rd_NO_MD": true,
            "rhgb": true,
            "ro": true,
            "root": "/dev/mapper/VolGroup-lv_root"
        },
        "ansible_date_time": {
            "date": "2016-01-25",
            "day": "25",
            "epoch": "1453708763",
            "hour": "07",
            "iso8601": "2016-01-25T07:59:23Z",
            "iso8601_micro": "2016-01-25T07:59:23.254603Z",
            "minute": "59",
            "month": "01",
            "second": "23",
            "time": "07:59:23",
            "tz": "UTC",
            "tz_offset": "+0000",
            "weekday": "Monday",
            "year": "2016"
        },
        "ansible_default_ipv4": {
            "address": "10.0.2.15",
            "alias": "eth0",
            "gateway": "10.0.2.2",
            "interface": "eth0",
            "macaddress": "08:00:27:ce:08:3d",
            "mtu": 1500,
            "netmask": "255.255.255.0",
            "network": "10.0.2.0",
            "type": "ether"
        },
        "ansible_default_ipv6": {},
        "ansible_devices": {
            "sda": {
                "holders": [],
                "host": "",
                "model": "VBOX HARDDISK",
                "partitions": {
                    "sda1": {
                        "sectors": "1024000",
                        "sectorsize": 512,
                        "size": "500.00 MB",
                        "start": "2048"
                    },
                    "sda2": {
                        "sectors": "82860032",
                        "sectorsize": 512,
                        "size": "39.51 GB",
                        "start": "1026048"
                    }
                },
                "removable": "0",
                "rotational": "1",
                "scheduler_mode": "cfq",
                "sectors": "83886080",
                "sectorsize": "512",
                "size": "40.00 GB",
                "support_discard": "0",
                "vendor": "ATA"
            }
        },
        "ansible_distribution": "CentOS",
        "ansible_distribution_major_version": "6",
        "ansible_distribution_release": "Final",
        "ansible_distribution_version": "6.5",
        "ansible_domain": "localdomain",
        "ansible_env": {
            "G_BROKEN_FILENAMES": "1",
            "HOME": "/home/vagrant",
            "LANG": "C",
            "LC_CTYPE": "C",
            "LESSOPEN": "|/usr/bin/lesspipe.sh %s",
            "LOGNAME": "vagrant",
            "MAIL": "/var/mail/vagrant",
            "PATH": "/usr/local/bin:/bin:/usr/bin",
            "PWD": "/home/vagrant",
            "SELINUX_LEVEL_REQUESTED": "",
            "SELINUX_ROLE_REQUESTED": "",
            "SELINUX_USE_CURRENT_RANGE": "",
            "SHELL": "/bin/bash",
            "SHLVL": "2",
            "SSH_CLIENT": "192.168.33.11 47686 22",
            "SSH_CONNECTION": "192.168.33.11 47686 192.168.33.12 22",
            "USER": "vagrant",
            "_": "/usr/bin/python"
        },
        "ansible_eth0": {
            "active": true,
            "device": "eth0",
            "ipv4": {
                "address": "10.0.2.15",
                "netmask": "255.255.255.0",
                "network": "10.0.2.0"
            },
            "ipv6": [
                {
                    "address": "fe80::a00:27ff:fece:83d",
                    "prefix": "64",
                    "scope": "link"
                }
            ],
            "macaddress": "08:00:27:ce:08:3d",
            "module": "e1000",
            "mtu": 1500,
            "promisc": false,
            "type": "ether"
        },
        "ansible_eth1": {
            "active": true,
            "device": "eth1",
            "ipv4": {
                "address": "192.168.33.12",
                "netmask": "255.255.255.0",
                "network": "192.168.33.0"
            },
            "ipv6": [
                {
                    "address": "fe80::a00:27ff:febd:216d",
                    "prefix": "64",
                    "scope": "link"
                }
            ],
            "macaddress": "08:00:27:bd:21:6d",
            "module": "e1000",
            "mtu": 1500,
            "promisc": false,
            "type": "ether"
        },
        "ansible_fips": false,
        "ansible_form_factor": "Other",
        "ansible_fqdn": "localhost.localdomain",
        "ansible_hostname": "localhost",
        "ansible_interfaces": [
            "lo",
            "eth1",
            "eth0"
        ],
        "ansible_kernel": "2.6.32-431.el6.x86_64",
        "ansible_lo": {
            "active": true,
            "device": "lo",
            "ipv4": {
                "address": "127.0.0.1",
                "netmask": "255.0.0.0",
                "network": "127.0.0.0"
            },
            "ipv6": [
                {
                    "address": "::1",
                    "prefix": "128",
                    "scope": "host"
                }
            ],
            "mtu": 16436,
            "promisc": false,
            "type": "loopback"
        },
        "ansible_machine": "x86_64",
        "ansible_memfree_mb": 303,
        "ansible_memory_mb": {
            "nocache": {
                "free": 362,
                "used": 96
            },
            "real": {
                "free": 303,
                "total": 458,
                "used": 155
            },
            "swap": {
                "cached": 0,
                "free": 927,
                "total": 927,
                "used": 0
            }
        },
        "ansible_memtotal_mb": 458,
        "ansible_mounts": [
            {
                "device": "/dev/mapper/VolGroup-lv_root",
                "fstype": "ext4",
                "mount": "/",
                "options": "rw",
                "size_available": 37877264384,
                "size_total": 40797364224,
                "uuid": ""
            },
            {
                "device": "/dev/sda1",
                "fstype": "ext4",
                "mount": "/boot",
                "options": "rw",
                "size_available": 448877568,
                "size_total": 507744256,
                "uuid": ""
            }
        ],
        "ansible_nodename": "localhost.localdomain",
        "ansible_os_family": "RedHat",
        "ansible_pkg_mgr": "yum",
        "ansible_processor": [
            "GenuineIntel",
            "Intel(R) Core(TM) i5-2450M CPU @ 2.50GHz"
        ],
        "ansible_processor_cores": 1,
        "ansible_processor_count": 1,
        "ansible_processor_threads_per_core": 1,
        "ansible_processor_vcpus": 1,
        "ansible_product_name": "VirtualBox",
        "ansible_product_serial": "NA",
        "ansible_product_uuid": "NA",
        "ansible_product_version": "1.2",
        "ansible_python_version": "2.6.6",
        "ansible_selinux": false,
        "ansible_ssh_host_key_dsa_public": "AAAAB3NzaC1kc3MAAACBAJhQyKxS0S7eBPSQAQFflxc/+PS9qHLlqF/uXOzLYQVqiPFc+T69/qDkGXSs1QCmzkE1uZn+n1b7cgWrO60SXGWOvfcCksj1RNh11UgI9gYdhyQ5nsISyIgjQIsMy8yFbQ/c8Cfm3PxqsxB1BN+8xZHoK7TVtfKo2k4Oazry5GIpAAAAFQDcs+i68mliSOy92y1mVcn6uhPNvwAAAIEAlxgquxWMUWiKALhLRM41y1ODpSIw83EE87BzUerXlF87SIYQRM6TRHpAVzzoNNBIXsJyifffDD0cf9RX0ygv03+o1O/4+oi9LvdwDA2t/yUGAGnXNIK8Xcof09/r3dVy2o+pxAIBgztHCezNSdsAEHb0k/v9l3CjqpkW4/x3tesAAACABjVw5Z0thBBCRODEjnYh+g8TDb0QIgCz+kwn6/ZmlyHYYcTlmnB6IqJxJqszQuDUKbprLXH0MWrEfMh3NYkOWwPo0WZfwaIccYRRQV2Y0ZhqIi/tpLne95FB+9oIo2i7iX5935yA1zqAvWhfcGdxjFcLJtZjij1f9yYasL9J0yw=",
        "ansible_ssh_host_key_rsa_public": "AAAAB3NzaC1yc2EAAAABIwAAAQEAv+VDpocINo7EnBb6PWeSCVvzxi3kNxo8uLpM04ZZUEKXYv8OkbRc+MLiBKuOHscXSdiwP016gMVCyVQmyrggUEQ1KvDSZFHDLcSSheuEiCTyxGdc0nFSG2E6AS+fth3zjL1mIj+G0U7FNHv4EVScNCFSpBQUsJwPpX9GRHtvpEZmtPgysnz5WCCv/7lCnKQubQRVffE2V24Kg2x4anUF23xaOJU75ZAi3uIZBrOOdQJKUqTLpUIcqE6BU3U0kqx+9hkPQYj/FhWyqn2GB9N+h8u6uvbEcsVtNPxWJEdE2/4rDjQBMHy6kXC6n2MG/q4gMVyLVy7IuP4vBccEOracew==",
        "ansible_swapfree_mb": 927,
        "ansible_swaptotal_mb": 927,
        "ansible_system": "Linux",
        "ansible_system_vendor": "innotek GmbH",
        "ansible_user_dir": "/home/vagrant",
        "ansible_user_gecos": "vagrant",
        "ansible_user_gid": 500,
        "ansible_user_id": "vagrant",
        "ansible_user_shell": "/bin/bash",
        "ansible_user_uid": 500,
        "ansible_userspace_architecture": "x86_64",
        "ansible_userspace_bits": "64",
        "ansible_virtualization_role": "guest",
        "ansible_virtualization_type": "virtualbox",
        "module_setup": true
    },
    "changed": false
}
デバッグについて
デバッグ機能ってどうなっているのか調べてみたので、ここで簡単に紹介しておきます (^^)
Playbook でうまく環境が構築できなかった場合には、どのような処理が行われているか詳細に表示させることでデバッグ出来るようになっています
デバッグログ
Ansible が裏側でどのような処理を行っているかを確認したい場合、-v オプションを指定する事でより詳細なログを画面に出力する事が出来るようになっています
-v
-vv
-vvv
※ v の数が多いほど詳細な情報が表示されます
先ほど作成した playbook でやってみましょう
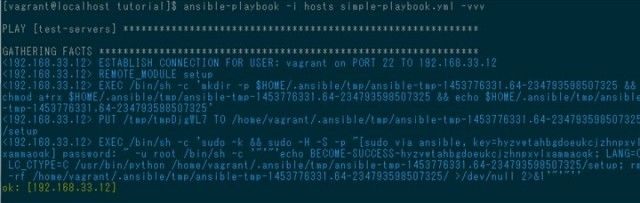
$ ansible-playbook -i hosts simple-playbook.yml -vvv
ログ情報が見難くて、なにが表示されたのかが判り難いです
Git bash here のターミナルはデフォルトのままだと青色でとても見にくいのでちょっと色を変えるのがお勧めです。
minttyにカラースキームを適用する
これを適用すると、見やすくなります (^^)
ステップ実行
–step オプションをつけるとtask をステップ実行することが出来ます
$ ansible-playbook -i hosts simple-playbook.yml -vvv --step

値の表示確認
debug モジュールを使えば、任意のメッセージや変数の値をコンソールに出力して確認することも出来ます
例えば、- debug: msg=”{{ ansible_os_family }}” のような感じでタスクを挿入して実行してみます
原始的な確認方法ですが、様々な状態を確認することが可能となっています
タスクの限定実行
tag を設定しておけば、その tag を指定することでその部分だけ実行させることも可能です
例えば先ほどの playbook でインストール処理だけにタグを付けて
- hosts: test-servers
  become: yes
  tasks:
    - debug: msg="{{ ansible_os_family }}"
    - name: be sure httpd is installed
      yum: name=httpd state=installed
      tags:
        - install
    - name: be sure httpd is running and enabled
      service: name=httpd state=started enabled=yes
–tags=”install” 指定して実行すると指定部分のみ実行されます
tags 機能は、下記記事が参考になります
ここが便利だよAnsible – Qiita
はじめに
前回、以下のエントリにてAnsibleの使いづらいところを紹介しました。
ここがヘンだよAnsible (ハマりどころと対策について) | Ansible Advent Calen…

以上
基本的なデバッグ機能に関して紹介しました
ここまでで、Ansible の基本のき ぐらいは体験できました
まだまだ不足してますが、少しずつ学んでいく為のよいきっかけにはなりました (^^)
WordPress構築まで試してみる
最後に元記事のチュートリアルで wordpress の構築まで行っている playbook があるので、それをやってみたいと思います
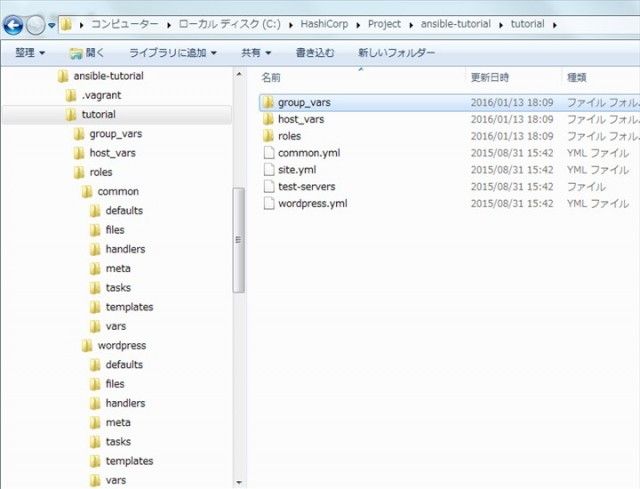
Linuxに慣れている方は、node1 に git をインストールして、元記事のチュートリアルどおりにやっていけば良いのですが、普段 Windows を使っている身としてはもう少しお手軽に試してみたいので、node1 の同期フォルダー tutorialに playbook を展開します
このページ(https://github.com/yteraoka/ansible-tutorial/tree/playbook)の Download ZIP ボタンをクリックして、ZIPファイルをダウンロード後、同期フォルダー tutorial で解凍します
この playbook は、Best Practicesと言われている標準的な構成に準じているそうです
構築手順が多く複雑になる場合は、タスクはroleという機能単位に分割(再利用性を考慮し、他のroleとの間に依存関係を持たせない)して、role を呼び出すようにすることが推奨されています
この playbook では、最初にマスターの site.yml が実行され、そこから common と wordpress role が呼びだされます
role は rolesディレクトリ下の名前で探しだされ、そのディレクトリ下のtasks/main.ymlが実行されます
common と wordpress role が何を行っているかというと、
common role
- EPELリポジトリ追加(追加後、設定ファイルでEPELリポジトリを無効化?)
- 必要なパッケージをインストール
- SSH接続情報ファイルの更新
- ネットワーク内の時刻を同期させるため ntpdサーバーをインストール
wordpress role
- httpサーバーのインストール
- MySql データベースのインストール
- PHP言語のインストール
- WordPressのインストール
処理の詳細については、サーバー環境の構築自体の知識が足りないのでまだ良く理解できていないところもあるのですが、概ねこの手順で WordPress が使えるところまで一気に構築しています
詳細は、エディターで実際に YAMLファイルを参照して読んでみてください
それでは ansible-playbook -i test-servers site.yml と入力して実行してみます
[vagrant@localhost tutorial]$ ansible-playbook -i test-servers site.yml
Please enter MySQL wordpress user password [wordpress]:

PLAY [all] ********************************************************************

GATHERING FACTS ***************************************************************
ok: [192.168.33.12]

TASK: [common | be sure epel repository is installed] *************************
changed: [192.168.33.12]

TASK: [common | disable epel repository] **************************************
changed: [192.168.33.12]

TASK: [common | be sure common packages are installed] ************************
changed: [192.168.33.12] => (item=libselinux-python,ntp,bind-utils)

TASK: [common | configure sshd_config] ****************************************
changed: [192.168.33.12] => (item={'insertafter': '#PasswordAuthentication no', 'regexp': '^PasswordAuthentication', 'line': 'PasswordAuthentication no'})
changed: [192.168.33.12] => (item={'insertafter': '#PermitRootLogin', 'regexp': '^PermitRootLogin', 'line': 'PermitRootLogin no'})
ok: [192.168.33.12] => (item={'insertafter': '#GSSAPIAuthentication', 'regexp': '^GSSAPIAuthentication', 'line': 'GSSAPIAuthentication no'})

TASK: [common | be sure ntpd is running and enabled] **************************
changed: [192.168.33.12]

NOTIFIED: [common | restart sshd] *********************************************
changed: [192.168.33.12]

PLAY [wordpress] **************************************************************

GATHERING FACTS ***************************************************************
ok: [192.168.33.12]

TASK: [wordpress | be sure httpd is installed] ********************************
ok: [192.168.33.12]

TASK: [wordpress | create document root] **************************************
changed: [192.168.33.12]

TASK: [wordpress | be sure httpd is configured] *******************************
changed: [192.168.33.12]

TASK: [wordpress | remove httpd welcome.conf] *********************************
changed: [192.168.33.12]

TASK: [wordpress | be sure httpd is running and enabled] **********************
ok: [192.168.33.12]

TASK: [wordpress | be sure mysql-server is installed] *************************
changed: [192.168.33.12] => (item=mysql-server,MySQL-python)

TASK: [wordpress | be sure mysqld is running and enabled] *********************
changed: [192.168.33.12]

TASK: [wordpress | Create database] *******************************************
changed: [192.168.33.12]

TASK: [wordpress | Create database user] **************************************
changed: [192.168.33.12]

TASK: [wordpress | be sure php is installed] **********************************
changed: [192.168.33.12] => (item=php,php-mysql,php-mbstring,php-gd,php-pear,php-pecl-apcu)

TASK: [wordpress | set timezone in php.ini] ***********************************
changed: [192.168.33.12]

TASK: [wordpress | download wordpress package] ********************************
changed: [192.168.33.12]

TASK: [wordpress | extract wordpress tar ball] ********************************
changed: [192.168.33.12]

TASK: [wordpress | generate secret keys] **************************************
changed: [192.168.33.12]

TASK: [wordpress | read secret keys] ******************************************
changed: [192.168.33.12]

TASK: [wordpress | configure wp-config.php] ***********************************
changed: [192.168.33.12]

NOTIFIED: [wordpress | restart httpd] *****************************************
changed: [192.168.33.12]

NOTIFIED: [wordpress | change wordpress files owner] **************************
changed: [192.168.33.12]

PLAY RECAP ********************************************************************
192.168.33.12              : ok=26   changed=22   unreachable=0    failed=0
確認
以下参考サイトのチュートリアルでは、serverspec を用いた構築環境のテストを行っています。正常に構築されているか様々なテストを行うことは大切でしょうが、Ansible の範疇を超えていると思いますので、ここでは割愛して手動で wordpress にアクセスできるかどうか確認します
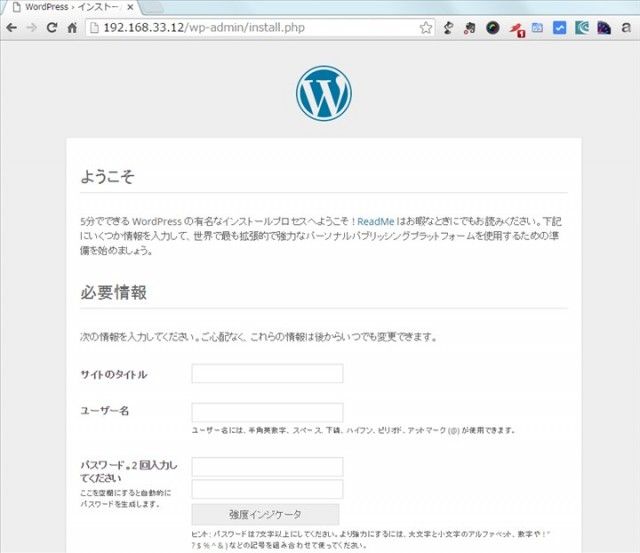
http://192.168.33.12 へアクセスすると既にデータベースの設定は mysql.yml で済んでいるので wordpress 初期設定画面へリダイレクトされます
設定が済めば、http://192.168.33.12 へアクセスすればサイトが表示されます
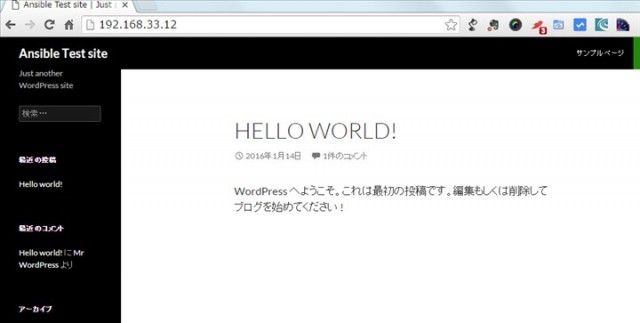
以上で WordPress まで構築できていることが確認出来ました
今回、 Ansible を学んで見ようと思ったきっかけは、Vagrant という仮想環境で wordpress の開発用環境を構築するのに vaw を試して見たのが始まりです。
vaw は非常に多彩な条件で環境を構築できるし、私の環境ではレスポンスがとても良かったので、もうこれしかないという感じでした。
この vaw でプロビジョニングで使われていたのが Ansible です
ただし、Ansible は、Windows環境とはあまり相性が良くないところもあります
実際 vaw も Windows 環境での同期フォルダーへはプロビジョニングの最後の部分で wordpress の wp-config.php の replace 処理時にコピー出来ずにエラーとなってしまいます
Ansibleを使えれば、その辺りも処理をカスタマイズすることで対策出来るかもしれないというのもありました
まだまだ Ansible の入り口に過ぎませんが、一歩は踏み出すことが出来ました
Linux に不慣れな Windowsユーザーでも、Vagrant の同期フォルダーを利用することで Ansible の Playbook の作成や利用が比較的楽に行えることが出来ます
この環境は様々な Playbook を試すのにも活用できるのでお勧めです (^^)
 のMySQLデータベースにHeidiSQLで接続する")


対応に置き換えてみる")