WordPress is heavy, so many people use cache plugins to speed up the process.
WP Super Cache and WP Fastest Cache are popular cache plugins, but we have created a New Page Cache plugin that is “Simple, Easy, Super Fast, and more functional” than these cache plugins, so please try it out!
YASAKANI Cache
Feature
The bottleneck, or rather the cause of WordPress’ slowness, is WordPress itself. It may sound like a contradiction, but the best way to solve the bottleneck is not to start WordPress, so cache plugins usually process before the core WordPress functions, so that they can run even 1ms faster.
On the other hand, the popular cache plugins (WP Super Cache, W3 Total Cache, WP Fastest Cache, etc.) are multifunctional, but their settings are sometimes complicated and difficult to understand, so there is a need for something simpler and easier to use.
YASAKANI Cache is a simple, easy to use, and super fast cache plugin that uses SQLite!
SQLite
SQLite is a feature-rich, SQL92-compliant, file-based database available in the public domain, and comes standard with PHP on many web servers.
Before using SQLite to load the core WordPress functions, you can use the drop in plugin advanced cache used by cache plugins for faster response.
As a byproduct of using SQLite, we were also able to implement a simple access log function, a bot blocking function, and a statistics function. Although this may increase the load and slow down the system a bit, it is a very profitable feature in total because it reduces the load on the server by restricting unauthorized bot access.
SQLite only requires a simple table structure for applications like this one, and only processes a few thousand data items using indexes, so there are no factors that would slow it down.
In addition, since many modern servers use SSD as Storage devices, the data I/O speed for SQLite database files is unlikely to become a bottleneck, and we can expect the same high speed processing as with memory caches, etc.
Effects
Let’s see how YASAKANI Cache works.
The test environment is when using X server.
When we pinged this site, it took about 15ms, so we can expect about 15ms of transmission time and other overhead due to the location of the server.
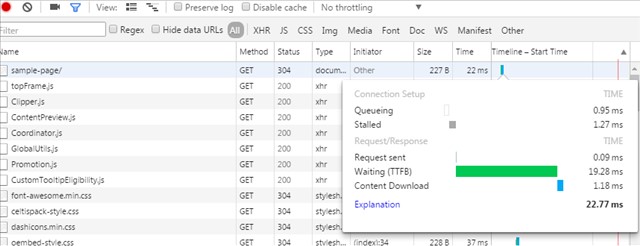
In this test, the waiting time is 19ms, so the real page cache processing time is about 4ms.
In the above display, the same browser is accessing the site multiple times, so the Last Modefied process also takes effect and 304 is displayed.
With this plug-in only, you may not feel that you have improved the speed of your website when you access it with a browser. Please try the methods described in “How to make your site even faster” below. In particular, if you set the browser cache in .htaccess, I think your PageSpeed score will improve!
Install
Many of the WordPress cache plugins work by using a file named advanced-cache.php, which is a specific file name for a drop-in plugin. This advanced-cache.php is loaded before the core wordpress functions are loaded to output the cache data.
You can only use one plugin that uses advanced-cache.php file. If you have other cache plugins such as WP Super Cache enabled, please disable them before installing.
Required Environment
- WordPress 6.5 or higher
- PHP version 8.1 or higher.
- PHP sqlite3 module must be enabled
This plugin automatically inserts the code for caching in wp-config.php file, and works as a drop-in plugin by placing the file advanced-cache.php in the wp-content folder. You need to have write access to wp-config.php file and wp-content folder.
YASAKANI Cache gzip-compresses and stores cached data in SQLite.
Problems have been reported when using zlib.output_compression in php.ini to gzip the output, so if you are using zlib.output_compression, force disable it
Download
You can download it from the official website!
Yasakani Cache
You can install the downloaded zip file by uploading the plugin on Plugins page – Add New.
Alternatively, you can search for and install YASAKANI Cache in PlugIns – Add New.
Notes on updating
If you want to update the plugin from the WP plugin management page, please deactivate the plugin and then reactivate it after updating.
If you update a plugin while it is still active, it may cause an error due to inconsistency with advanced-cache.php depending on the content of the update. In such cases, delete the define (‘WP_CACHE’, true) definition in wp-config.php and delete the advanced-cache.php file under /wp-content using an FTP tool.
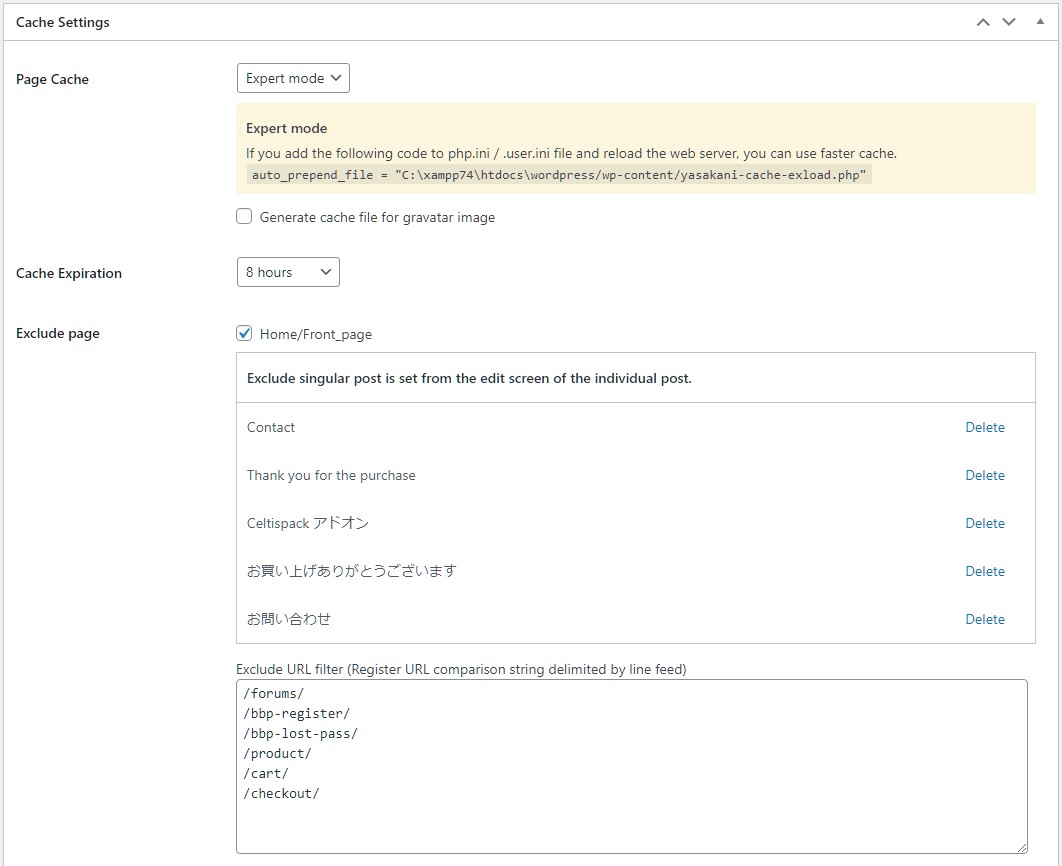
Cache Settings
YASAKANI Cache can be started/stopped by simple and easy setting.
Start Page Cache
It’s very easy to start using, just select the cache expiration date and enable the Page Cache!
There are two cache modes: Simple mode or Expert mode, and expert mode can be used to further speed up and protect against zero-day attacks.
Expert mode
To enable Expert mode, php.ini or .user.ini files must be editable. You can manually switch from Simple mode to Expert mode automatically by writing auto_prepend_file
auto_prepend_file
If you can edit php.ini, you can add the specified auto_prepend_file setting to speed up the process and protect against zero-day attacks.
PHP: Description of core php.ini directives – Manual
Even if you cannot edit php.ini, you may be able to use .user.ini or .htaccess files depending on your server environment.
Note: Even if you can edit php.ini, writing auto_prepend_file will cause problems on servers that use a common php.ini when running multiple WordPress sites. In such a case, try .user.ini instead of php.ini.
In the case of CGI/FastCGI SAPI and .user.ini is available
Copy the content of auto_prepend_file shown in the settings screen and add it to .user.ini file
PHP: .user.ini files – Manual
If you are using Apache Module and .htaccess is available
You may be able to set auto_prepend_file in .htaccess under the document root.
It may not be allowed in some environments, but try it if you can (if it is not allowed, you will get an error such as 500 Internal Server Error)
In addition, .htaccess file is different from php.ini file and looks like this
php_value "auto_prepend_file" "(specified in the setting screen) yasakani-cache-exload.php"
REST API data cache
Caches REST API responses for GET and OPTIONS methods to speed up response times.
Gravatar image cache
Create a cache file of Gravatar images to speed up the process.
If many Gravatar images are used in the comment function, you can expect a speed-up.
Cache Expiration
The expiration time can be selected from 10 minutes / 1 hour / 4 hours / 8 hours / 1 day / 7 days
Use the log function to see how many cache hits you actually get, and adjust accordingly.
When using plugins that use the Ajax function, if you set the cache time for more than 1 day, the nonce code for security measures may expire, so we recommend a cache time of 8 hours or less. If you set the cache time for more than 1 day, please make sure that there are no problems.
Cache target pages
Page caching only applies to home, front pages, pages, posts , custom post pages and WP embedded blog cards.
However, even if a page is cached, it will be excluded under the following conditions.
- Do not show cache for logged-in users
- Do not cache password-protected pages
- PHP errors (excluding warnings and below) will not be cached
REST API caching only applies to GET and OPTIONS methods.
Even if a request is eligible for REST API caching, it will be excluded under the following conditions.
- REST response data is empty
- REST status non-200 responses
- Error in matching request with nonce
- PHP errors (excluding warnings and below) will not be cached
Exclude page option
Exclude URL filter
You can exclude matching pages from the cache by registering substrings of URL or REST API endpoint.。
Exclude request pages that contain substrings registered in the request URL, such as /forums/, /product/, /cart/, /wp/v2/user, etc., from the cache
If there are pages that you want to exclude from the cache, you can set this in the meta box that appears on the edit page for that page.
You can also set the page to be excluded from optimization if CSS or JS optimization is enabled
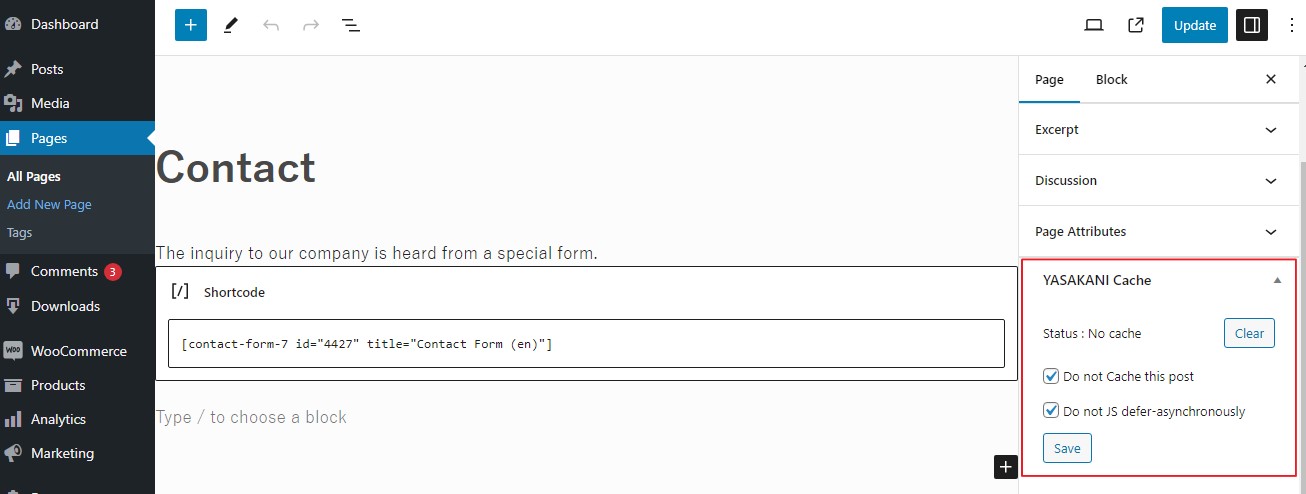
If you set cache exclusion for an specific post or page, it will also be listed in the general settings screen.
To change an excluded page back to a cached page, click Delete link in the title list of the excluded page in the settings page, or remove it from the meta box in the specific edit page
Mobile Support
Page caching is managed separately for Mobile and PC devices using the WordPress core function wp_is_mobile
Stop Page Cache
It’s easy to stop, just disable Page Cache!
CSS minification and JS asynchronous loading
Speed up by minimizing CSS and loading JavaScript asynchronously
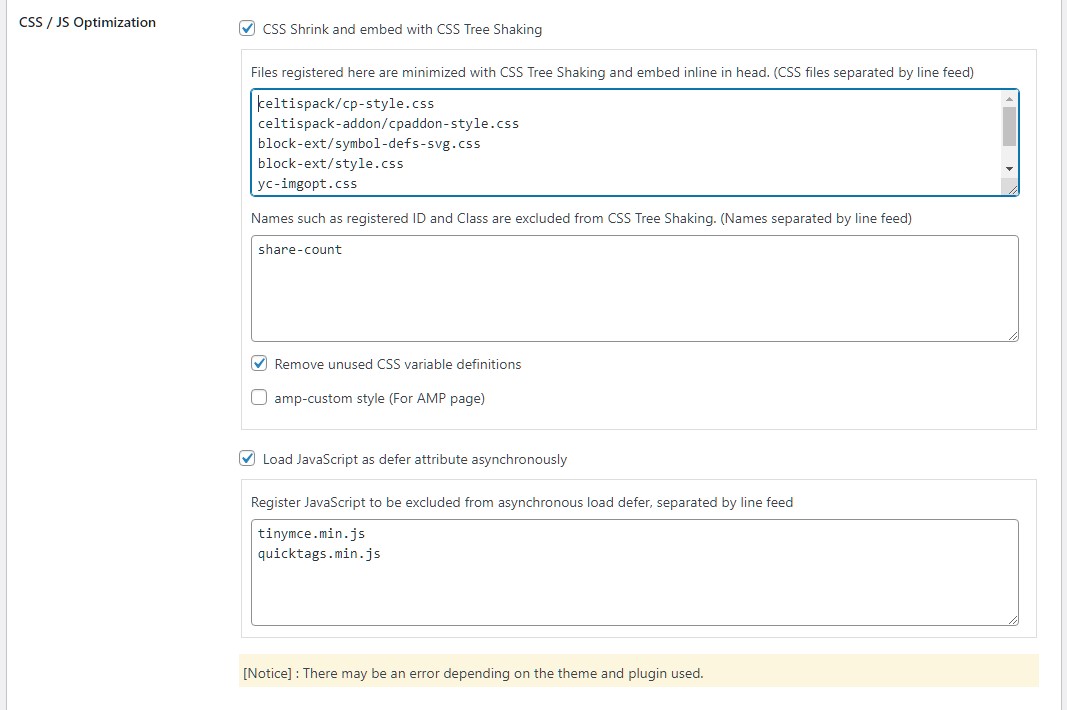
CSS Minify (Tree Shaking)
- Shrink the specified CSS file (under wp-content and wp-includes directory on your site) with CSS Tree Shaking and embed it inline in head.
For AMP pages, shrink amp-custom style with CSS Tree Shaking*ver3.7.1 unsupported
CSS Tree Shaking removes unused id and class style definitions from CSS definition data.
The CSS defined for the id and class added after loading the DOM with JavaScript, etc. may also be deleted, so be sure to check the operation.
If a problem occurs, register the name of the id or class to be excluded from the CSS Tree Shaking, and the definition will not be deleted.
JavaScript (defer)
Add defer to JavaScript file for asynchronous loading
HTML, CSS minification and JS asynchronous loading may cause errors depending on the theme or plugin you are using.
Maintenance
Export/import configuration data, clear cache database, and perform a hard reset.
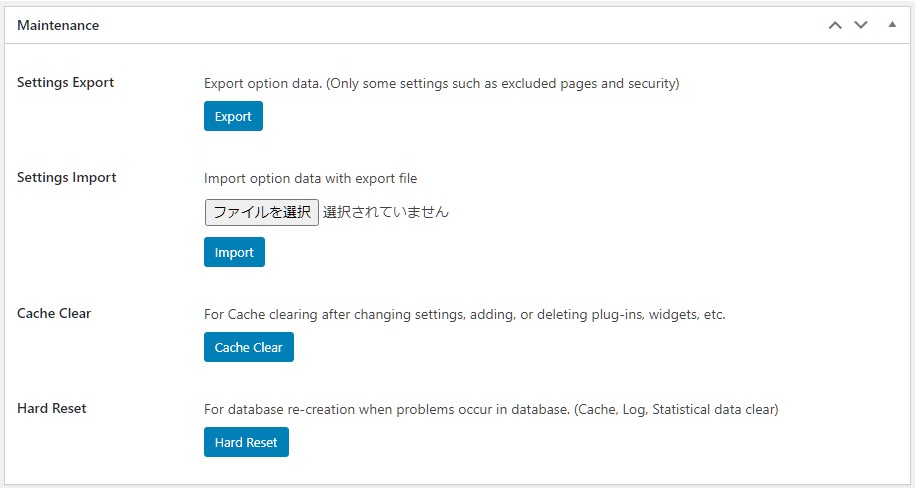
Export/Import
Configuration data (except for some settings) can be exported/imported as JSON file.
Cache Clear
You can clear just the REST cache, or both the REST and page caches.
When you edit or delete a post, the cache of the corresponding post will be cleared automatically.
When you change the settings of plugins, themes, widgets, etc., please click the Clear Cache button in the maintenance mode.
You can clear the cache of specific pages from the meta box that appears in the edit screen.
Hard Reset
There may be problems with the cache database.
It is most likely that some of the tables in the database are corrupted, and in most cases, you will only be able to read the database, not write to it. The clear cache button will also stop working.
If you suspect that the database is broken, you can do a hard reset (database re-creation) to recover it.
A hard reset will also initialize logs and statistics.
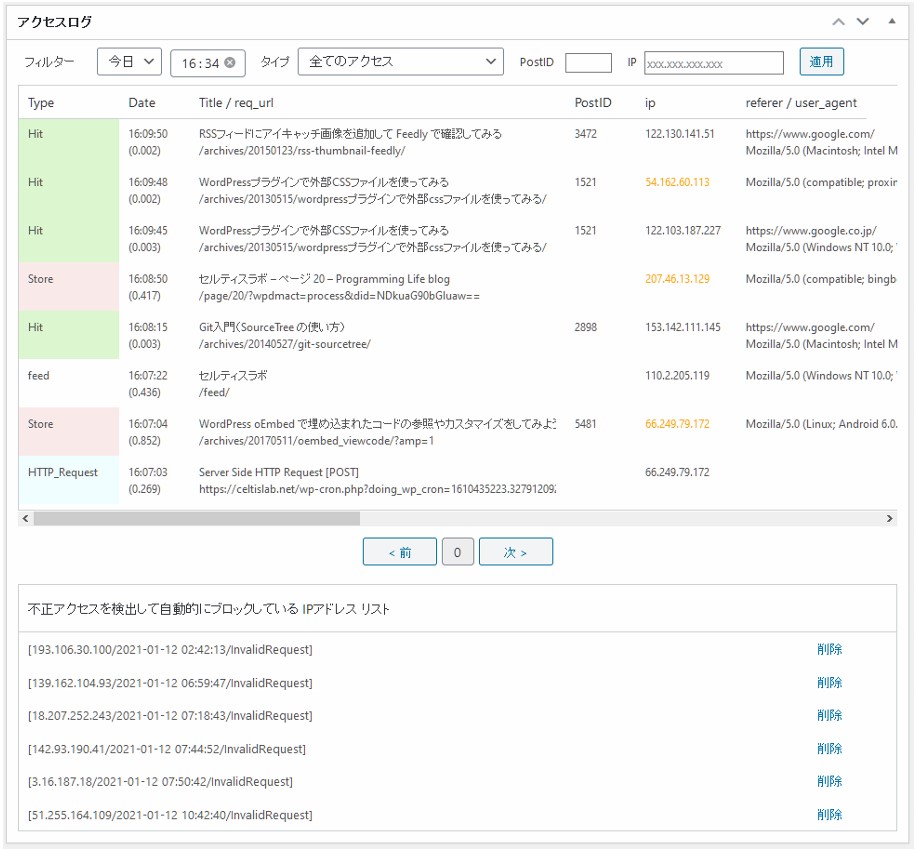
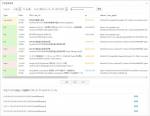
Access Log
One of the features of YASAKANI Cache is the ability to generate Access log. The log is used to check the access status and for security measures.
If you’ve enabled the cache plugin but something is slow and you’re not sure if it’s working or not, try using the logs to check the access status, cache usage and response time.
Disabling logging will improve the performance of page cache.
However, if you consider the site as a whole, it is recommended to use logs for security and bot access prevention to reduce the load on the site.
If cached, Hit or not_modified will be displayed and its execution time will be shown.
If it is not cached, the browser cookie (COOKIE) of the logged-in user may be affecting the cache display.
PHP errors (except for warnings and below) are also not cached.
Therefore, if you are using certain plugins or themes that cause PHP errors, you may find that many pages are not cached.
Accesses with errors will be displayed with the Type as php_error or with an (E), such as Store (E), and the error content will pop up when you mouse over it.
The IP address section is color-coded as follows: Bot (orange) / Normal access (black) / Logged-in user (green) / Server (light blue)
BOTs are judged based on the presence of the specified keywords in the user agent and whether they are registered in the black list, which may lead to misjudgment.
Log Filter
Logs can be easily referenced by date, time, and type.
- 7days & Time: Refer to the log of the time period you want to check.
- Type: Refers to the type of request, such as login or invalid request.
- Post ID: Refine your search by post ID of Posts and Pages.
- IP:Reference to a specific IP
- Paging: Refer to logs with specified conditions, paginated by 100 logs.
Only the requests that are passed to WordPress will be logged; requests for images and other data that are processed by the web server will not be logged.
The execution time is measured internally from the time the connection is made to the SQLite database to the time the data is output, not including the communication time.
Up to 7 days of logs are stored in the database. you can download yasakani_cache.db using an FTP tool, and then analyze it using a tool that can handle SQLite databases in a local environment.
The database file containing the log data is restricted in the .htaccess file for Apache servers so that it cannot be accessed directly.
However, if you are using a server other than Apache, please take measures to prevent the administrator from directly accessing wp-content/yasakani-cache/yasakani_cache.db file.
Statistics
If logs are enabled, you can easily see today’s and yesterday’s stats (PV / Bot / Popular Posts / Referrers)
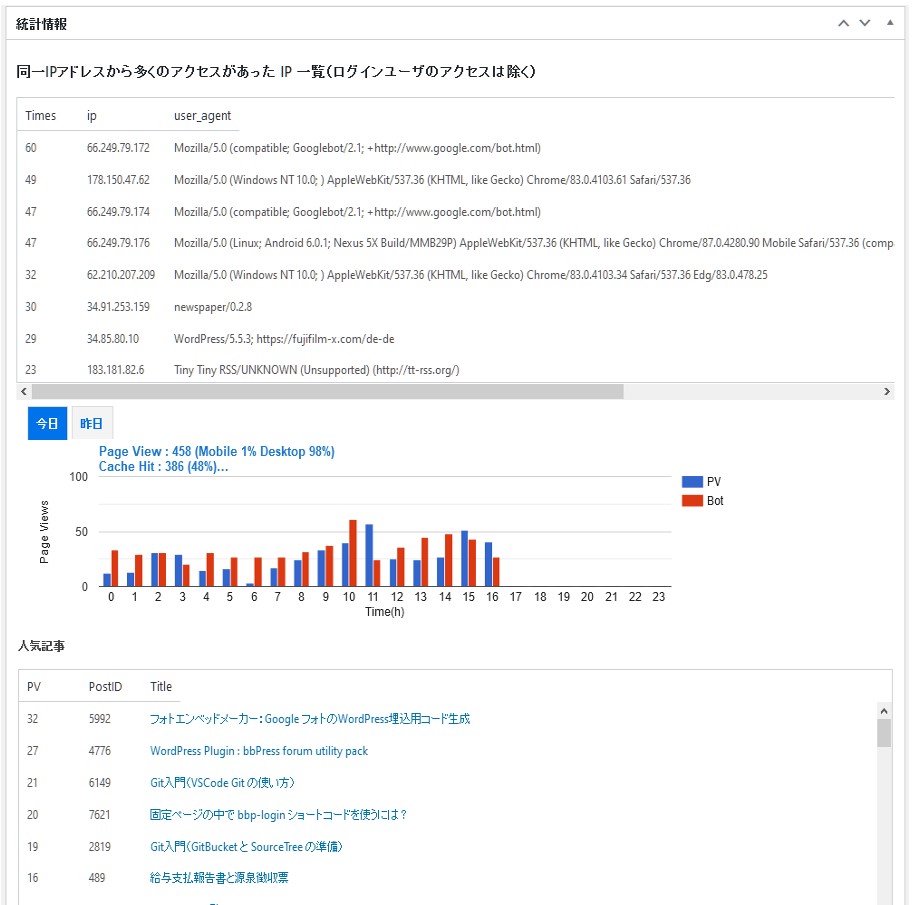
The statistics are based on the access to the WordPress site on the server, so the number of PV will not be the same as the web beacon access analysis using tracking codes like Google Anaritics.
Normally, when tracking code is used, when a user accesses the site with a browser, JavaScript is executed and access information is collected and analyzed by a specific server, so bots and other accesses are excluded.
However, if you try to analyze the access to the server at the time of access, it is necessary to accurately determine at that time whether it is a bot or a user accessing from a browser (some bots may disguise their user agent as if they were accessing from a normal browser), and the PV number will be larger than the Web beacon method.
The good thing about this method is that it allows for restrictions on bot access, etc.
There are a surprisingly large number of bots coming to access your site. You can use this plugin to see how many bots are accessing your site.。
Using statistics, you can easily identify suspicious IPs that issue many requests from the same IP.
Bots from google, yahoo, bing, etc. are not a problem, but some bots are malicious.
If you want to prohibit access from malicious bots, you can add them to the bot blacklist in the security function.
Security settings
YASAKANI Cache also implements security and bot restriction features.
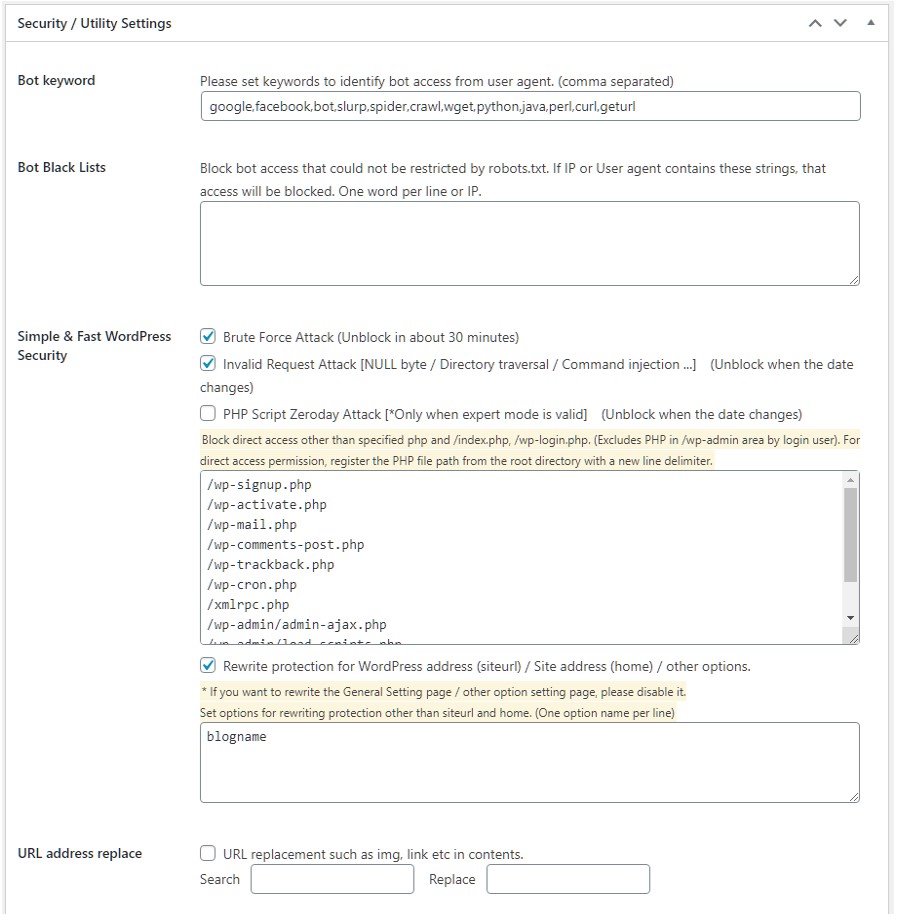
Bot keyword
Register keywords to determine whether a user agent is a bot or not.
If the user agent contains any of the characters registered in the user agent (not case-sensitive), it will be considered a bot access.
Bot black lists
Usually, robots.txt is used to restrict access to bots.
However, malicious bots cannot be restricted, so they are often restricted by .htaccess files, etc. Therefore, we have implemented a function to restrict them more easily.
Set a string to identify bots included in the IP or user agent of bots to be blocked, separated by a new line. Accesses that match the conditions registered here will be blocked.
If logs are available, you can see a list of IPs that have been accessed a lot from the same IP address, and use this to determine if the bot should be blocked.
Server IP and login user IP are excluded from the list, but please be careful not to register your own IP address!
For more details, please refer to the following article (it is a Japanese post, so please use Google Translate or similar to refer to it)
YASAKANI Cache を使ったボットの確認とブロック方法
Simple Security
You can use a simple security feature to prevent invalid requests.
- Brute Force
- Invalid Request Attack [NULL byte / Directory traversal / Command injection …]
- PHP Script Zeroday Attack
- Rewrite protection for WordPress address (siteurl) / Site address (home) / other options
If the security feature is enabled, access from IPs that are determined to be invalid requests will be automatically blocked.
The blocked period is until the date change, and the block will be removed the next day. If you want to block all the time, register the target IPs to the bot blacklist.
By specifying the IP that makes invalid requests in the log filter, you can track accesses from that IP in the log.
For more details, please refer to the following article (it is a Japanese post, so please use Google Translate or similar to refer to it)
YASAKANI Cache に HTTP header キャッシュ機能と簡易セキュリティを追加
Brute Force
After 5 failed login attempts, access from that IP will be automatically blocked for 30 minutes.
Blocked IP will not only restrict login but also block access to the site.
You can also register login user input names that you consider to be brute force attacks. For example, “admin” or “site name” is often used as the user attempting to log in, so registering them separated by a comma will block that user from logging in.
Invalid Request Attack
The following is a simple judgment
Cross-site scripting
If the REQUEST_URI data contains any tag <>, it is considered an invalid request
Super Global Pollution
Any superglobal variable in _GET, _POST, or _COOKIE is considered an illegal request.
NULL byte
A NULL (zero) in the REQUEST_URI or _POST data is considered an invalid request.
Directory traversal
REQUEST_URI data and _POST data containing relative addresses are considered invalid requests.
Command injection
If the _REQUEST_URI data or _POST data is suspected to contain PHP code that can be used for shell operations, etc., it will be considered an invalid request.
For comments and bbPress forum posts (_POST data), we cannot simply determine whether they contain illegal characters or not.
It is recommended to use anti-spam measures such as Akismet plugin.
PHP Script Zeroday Attack (Expert mode only)
Use auto_prepend_file to block direct access to PHP script files.
WordPress does not normally block direct access to vulnerable PHP files in plugins and themes. The reality is that there are repeated attacks on sites every day to gain direct access to PHP files of vulnerable plugins.
By using auto_prepend_file, it is possible to check which PHP file is accessed when a direct access to PHP is made, so you can block unauthorized access to PHP files in plugins and themes.
However, since wordpress has wp-login.php and some other PHP files that are accessed directly in normal operation, you should not block access to them.
Also, when a logged-in user displays the dashboard and performs administrative operations, various PHPs in the wp-admin area are also directly addressed. Therefore, allow all direct access to wp-admin area for logged-in users (security is lax, but usability is a priority).
Allow direct access to the following PHP files by default
- /index.php
- /wp-login.php
- /wp-signup.php
- /wp-activate.php
- /wp-mail.php
- /wp-comments-post.php
- /wp-trackback.php
- /wp-cron.php
- /xmlrpc.php
- /wp-admin/admin-ajax.php
- /wp-admin/load-scripts.php
- /wp-admin/load-styles.php
If you have other PHP files that you want to allow direct access to, you can add them to the whitelist from the setting screen to make them accessible.
Rewrite protection for WordPress address (siteurl) / Site address (home) / other options
WordPress address (siteurl) / site address (home) / other optional write protection
Protects against siteurl and home rewriting (update_option)
Also, if you have other option data that you want to protect, you can register the name of the option when update_option is executed to protect that option from being overwritten.
You will need to look up the option name from the YASAKANI access log when the option was updated, or from the source code of the WordPress program, so it’s not easy, but do your best!
If you want to rewrite the siteurl or home, you will need to temporarily disable this protection before doing so.
There is an attack on a website where the siteurl and home data in the options data is rewritten to lead the user to another site.
Although the method of attack is unknown in many cases, it is believed that CSRF is used to perform unintended operations with the user’s authority.
It is recommended that important optional data such as siteurl and home cannot be easily rewritten even if the user has the authority to do so.
URL address replace (utility)
When the site address is changed (e.g. SSL), the URL in the output page data will be replaced without replacing the site URL address in the database.
Once the site is SSL enabled, mixed content errors will occur frequently if internal links or images in past posts contain URL addresses that begin with http.
In order to support SSL, the Serch Regex plug-in is often used to rewrite URL addresses in the database.
A simpler method is to leave the data in the database as it is, and replace the URLs of internal links, etc. at the time of outputting the content.
For example, to change a site called http://xxxx.com to https://xxxx.com, set http://xxxx.com as the URL address to search, and set https://xxxx.com as the replacement URL address.
You may wonder if doing URL substitution for each content output is a bad practice, but with cache plugins, URL substituted page data is cached.
Therefore, once the URL replacement is done, it will be cached and the replaced cache data will be used until the cache expires, so the load of URL replacement is negligible.
DB/File Diff Monitor and Backups
It would be fine if the security features could block all unauthorized access, but there is no 100% security.
This is a file change monitoring feature that can help you recover from any damage that may have been done.
Available with DB/File Diff Monitor and Backups. For more information, see the following articles
WordPress Plugin : DB/File Diff Monitor and Backups
How to make your site even faster
This plugin uses PHP and SQLite to handle the page cache processing. The effect is to reduce waiting (TTFB) time, reduce CSS size, and load JS files asynchronously.
Here are a few pointers to make it even faster
- Server Environment
- Browser Caching
- plugin filter
- Image Optimization
Server Environment
If the basic server environment is slow, you can’t expect to get faster speeds.
Points to consider include line capacity, number of CPU cores, memory capacity, use of SSD, use of the latest version of PHP, etc.
Also, most of the servers are probably Apache servers, but if you can use Nginx servers, you may be able to make it even faster!
Browser Caching
Since the YASAKANI cache does not modify the .htaccess file of the Apache server, you can edit the .htaccess file and use mod_deflate, mod_expires, etc. to speed up the browser cache and Gzip compression.
| mod_deflate | GZIP compression and transfer of HTTP communication of HTML, CSS, and JS The client indicates which compression methods it supports in the Accept-Encoding header of the HTTP request. When the web server returns the HTTP response, it informs you of the compression method in the Content-Encoding header. |
| mod_expires | By caching the content (HTML, CSS, JS, image data, etc.) retrieved by the browser and setting the validity period, the number of http requests and data transmission size can be reduced. |
Please do your research thoroughly before editing .htaccess. Also, don’t forget to back up your original .htaccess file!
Plugin filter
WordPress slows down if you use a lot of plugins
There is no need to always enable plugins that are required only for a specific page.
You can use the Plugin load filter to enable only the plugins you need for that page. By disabling unnecessary plugins, you can avoid loading the related CSS and JS files.
WordPress Plugin : Plugin Load Filter

By using Plugin Load Filter, you can speed up pages that are not cached. It also has the effect of removing useless CSS and JS from pages to be cached (HTML pages with unnecessary JS and CSS removed will be cached).
Image Optimization (WebP/AVIF)
Image data increases communication volume, so it is important to reduce the number of images used in a page, image size, compression ratio, etc., and use delayed loading to reduce communication data and communication time.
you can easily convert jpeg/png images to WebP/AVIF format and output them to reduce the amount of image data transfer by using Realtime Image Optimizer.
For more information about Realtime Image Optimizer, please refer to the following page.
WordPress Plugin : Realtime Image Optimizer

Disclaimer
The author is not responsible for any damage caused by the use of this software, so please use it at your own risk.